I recently started learning AngularJS. It took me some time to arrange my environment to run my first example.
So I created the following JSFiddle with the simplest possible running AngularJS code that comes to my mind.
http://jsfiddle.net/afzal_hussain/j4mjcvzo/
Sunday, January 18, 2015
Sunday, October 13, 2013
GWT Generator, Part 3: Debugging your generator code
This is the third installment of my three part post regarding GWT generator. This post identifies some simple ways to debug GWT code generator. Other two parts are here and here.
I will be reusing the code examples that I provided into my second installment: a very simple GWT generator example. You can download the complete Eclipse project as a zip file, or look at the Java codes from that post.
View the generated code
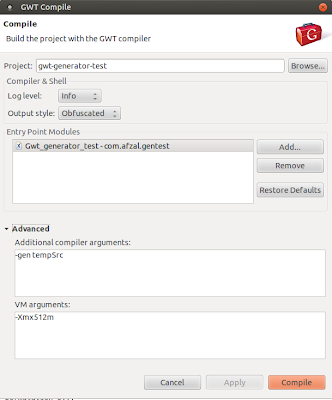
When you compile your GWT project, it normally uses the system temp folder to output all the intermediate files. You can configure the GWT compiler to output them in a specific folder with a compiler argument.
To do this, I am assuming you are using Eclipse with GWT plugin. Go to the GWT compile dialogue. Click on the "Advanced" link at the bottom left. This should open two more text boxes naming "Additional Compiler Arguments" and "VM Arguments". As you can guess, VM arguments goes directly to the JVM, while the compiler arguments are processed by the GWT compiler.
Put the following switch into the "Additional Compiler Arguments"
I have used a folder called "tempSrc" which is a relative folder, as in the following screenshot. The directory must be writable. You might need to pass an absolute folder to make this work.
Now after running compile, if I refresh my project in the explorer, I will see a new folder called "tempSrc", and inside that I can find the generated Java files. Actually this is how my generated code looked:
Debugging the generator
Sometimes looking at the generated code is not enough. If your generator fails to generate code by throwing some exception, it's a better idea to debug the generator process. A stepping through the generator actually helps understand the GWT generator too.
Since generator is accessed at compile time, you need to basically debug the GWT compiler, with a break point at the first line of your generate() method.
Follow the below steps to run the GWT compiler in debug mode. I will try to be as detailed as possible.
Step1: Open the debug configuration window in Eclipse. You can do that by either going to "Run -> Debug Configurations", or by clicking the bug icon in the toolbar.
Step2: Select the "Java Application" on the left side. Right click on it, and select "New". This will create a new debug configuration named "New Configuration"

Step3: In the "New Configuration", change the name to something meaningful, lets say "GWT compiler". This is optional step, you can continue with the name "New Configuration" if you want. The screenshots will assume that you have changed the name to "GWT compiler"

Step4: In the debug configuration, you should be in the "Main" tab. Make sure that in the "Project" text box correct GWT project is selected. In my case it's the "gwt-generator-test". If not, you can select the right GWT project by clicking the "Browse" button next to it.
Step5: Also in the main tab, click on the "Search" button next to "Main Class" text box. Write "Compiler" in the popup window. The matching item list should show you the GWT compiler which is "com.google.gwt.dev.Compiler".

Step6: Your main tab should look like this:

Step7: Go to the "Arguments" tab. Again you have two text boxes, program arguments (which are the GWT compiler arguments) and VM arguments. GWT compiler has lots of arguments, but only one is absolutely mandatory : your gwt module name. Put your GWT module name in the program argument box. It's also a good idea to provide some memory to the VM arguments. So the argument box looks like this in my case:

Step8: Go to the "Classpath" tab, and select the project name under "User entries". This should enable all the buttons on the right. In my case, I selected the entry called "gwt-generator-test (default classpath)"

Step9: Click on the "Advanced" button to bring the "Advanced Options" popup, and select "Add folder".

Step10: When you click okay, it will bring a folder browser. Select the "src" folder of your GWT project.

Step11: Now your "Classpath" tab should look like this:

Step12: Put a break-point in the first line of the generate() method of your generator. In my case its on 22 line of BuildInfoGenerator.java.
Step13: Open the Debug Configurations again, and press "Debug" on the "GWT Compiler" task. In few seconds, you should have a break point hit on the first line of generate() method. From there on, you can step on to see what actually going on.
GWT Compiler Arguments
GWT compiler arguments are listed into many places. Here they are once more.
I will be reusing the code examples that I provided into my second installment: a very simple GWT generator example. You can download the complete Eclipse project as a zip file, or look at the Java codes from that post.
View the generated code
When you compile your GWT project, it normally uses the system temp folder to output all the intermediate files. You can configure the GWT compiler to output them in a specific folder with a compiler argument.
To do this, I am assuming you are using Eclipse with GWT plugin. Go to the GWT compile dialogue. Click on the "Advanced" link at the bottom left. This should open two more text boxes naming "Additional Compiler Arguments" and "VM Arguments". As you can guess, VM arguments goes directly to the JVM, while the compiler arguments are processed by the GWT compiler.
Put the following switch into the "Additional Compiler Arguments"
-gen TARGET_DIRECTORY_PATH
I have used a folder called "tempSrc" which is a relative folder, as in the following screenshot. The directory must be writable. You might need to pass an absolute folder to make this work.

Now after running compile, if I refresh my project in the explorer, I will see a new folder called "tempSrc", and inside that I can find the generated Java files. Actually this is how my generated code looked:
Debugging the generator
Sometimes looking at the generated code is not enough. If your generator fails to generate code by throwing some exception, it's a better idea to debug the generator process. A stepping through the generator actually helps understand the GWT generator too.
Since generator is accessed at compile time, you need to basically debug the GWT compiler, with a break point at the first line of your generate() method.
Follow the below steps to run the GWT compiler in debug mode. I will try to be as detailed as possible.
Step1: Open the debug configuration window in Eclipse. You can do that by either going to "Run -> Debug Configurations", or by clicking the bug icon in the toolbar.
Step2: Select the "Java Application" on the left side. Right click on it, and select "New". This will create a new debug configuration named "New Configuration"

Step3: In the "New Configuration", change the name to something meaningful, lets say "GWT compiler". This is optional step, you can continue with the name "New Configuration" if you want. The screenshots will assume that you have changed the name to "GWT compiler"

Step4: In the debug configuration, you should be in the "Main" tab. Make sure that in the "Project" text box correct GWT project is selected. In my case it's the "gwt-generator-test". If not, you can select the right GWT project by clicking the "Browse" button next to it.
Step5: Also in the main tab, click on the "Search" button next to "Main Class" text box. Write "Compiler" in the popup window. The matching item list should show you the GWT compiler which is "com.google.gwt.dev.Compiler".

Step6: Your main tab should look like this:

Step7: Go to the "Arguments" tab. Again you have two text boxes, program arguments (which are the GWT compiler arguments) and VM arguments. GWT compiler has lots of arguments, but only one is absolutely mandatory : your gwt module name. Put your GWT module name in the program argument box. It's also a good idea to provide some memory to the VM arguments. So the argument box looks like this in my case:

Step8: Go to the "Classpath" tab, and select the project name under "User entries". This should enable all the buttons on the right. In my case, I selected the entry called "gwt-generator-test (default classpath)"

Step9: Click on the "Advanced" button to bring the "Advanced Options" popup, and select "Add folder".

Step10: When you click okay, it will bring a folder browser. Select the "src" folder of your GWT project.

Step11: Now your "Classpath" tab should look like this:

Step12: Put a break-point in the first line of the generate() method of your generator. In my case its on 22 line of BuildInfoGenerator.java.
Step13: Open the Debug Configurations again, and press "Debug" on the "GWT Compiler" task. In few seconds, you should have a break point hit on the first line of generate() method. From there on, you can step on to see what actually going on.
GWT Compiler Arguments
GWT compiler arguments are listed into many places. Here they are once more.
GWT Generator, Part 2: A very simple GWT generator example
I have divided the topic of GWT generator in three posts. This is the second installment which provides a simple GWT generator example. First one is here regarding what is GWT generator. And a third one here provides simple ways how you can debug your GWT generator.
Goal
Using GWT generator to find out the timestamp of when the GWT project was compiled. You can use this as a very simplified build ID.
Steps
Step1: Define an interface. The implementation of this interface will be generated at the compile time by the GWT generator. In my case, the interface is as follows:
Step2: Write a generator that will generate a class which implements this interface. In my case, the generator is as follows:
Step3: In the module xml, tell GWT compiler to generate any instance of BuildInfo interface with the above generator. In my case that section
Step4: Instantiate the BuildInfo interface through GWT.create(). Since I already have told the GWT compiler to generate any such case with the generator, the returned class will be actually generated with the above generator. After that simply use the returned class.
Step5: Compile and run the app in production mode. Or just run the app in development mode. You will be greeted with a popup alert, which will state something like below:

The timestamp in the above screenshot was actually generated by the BuildInfoGenerator, which kind of hard coded it when the web app was compiled.
That's it, that was a fully working example of GWT generator generating a class. Even though this specific generator does not add much functionality, this should give you the basic steps required of GWT generators.
If you want to download the complete Eclipse project for the above code, you can download it from the dropbox:
Download complete Eclipse GWT project as ZIP file
Few important points
The Java code emitting as above is not very intuitive. I discussed some basic ways to debug this process here. If you are facing any problems, like compile errors or something else, do have a look.
Goal
Using GWT generator to find out the timestamp of when the GWT project was compiled. You can use this as a very simplified build ID.
Steps
Step1: Define an interface. The implementation of this interface will be generated at the compile time by the GWT generator. In my case, the interface is as follows:
Step2: Write a generator that will generate a class which implements this interface. In my case, the generator is as follows:
Step3: In the module xml, tell GWT compiler to generate any instance of BuildInfo interface with the above generator. In my case that section
Step4: Instantiate the BuildInfo interface through GWT.create(). Since I already have told the GWT compiler to generate any such case with the generator, the returned class will be actually generated with the above generator. After that simply use the returned class.
Step5: Compile and run the app in production mode. Or just run the app in development mode. You will be greeted with a popup alert, which will state something like below:

The timestamp in the above screenshot was actually generated by the BuildInfoGenerator, which kind of hard coded it when the web app was compiled.
That's it, that was a fully working example of GWT generator generating a class. Even though this specific generator does not add much functionality, this should give you the basic steps required of GWT generators.
If you want to download the complete Eclipse project for the above code, you can download it from the dropbox:
Download complete Eclipse GWT project as ZIP file
Few important points
- Instead of passing GWT.create() an interface, you can pass a concrete implementation too. If you return null from the generate() method, it will use the original class that was used as the argument of GWT.create(). This could be a good way only to generate the code when some special conditions are true, and not always. If the argument was an interface (as in my case), that will raise a compile time error.
- It's very important to understand, the generate method of the generator class (in my case BuildInfoGenerator) will be invoked more than once, one for each compile permutation.
- GeneratorContext.tryCreate() method (line 40) will return a PrintWriter if one already does not exist. Since generate method is called more than once, it means after the first time, tryCreate() will return null. It's very important that instead of returning null in such cases, you return the fully qualified class name (see line 42). Otherwise code generations will not work for these compile permutations, and you will be facing some very unintuitive behavior.
The Java code emitting as above is not very intuitive. I discussed some basic ways to debug this process here. If you are facing any problems, like compile errors or something else, do have a look.
GWT Generator, Part 1: What is GWT Generator?
I have recently wrote my first GWT generator, and I must say, it was a very elusive task to complete. Many times I thought I have finally grasped it, and yet came another problem. I wasn't able to find any simple example in Internet that worked both in development mode, and then compiled without any problem.
Finally, when I was finished, it was very easy in retrospect. But lack of detailed documentations made the task difficult, or I would rather say elusive. It was so frustrating, that I have decided to write my first ever blog entry :).
I have divided the topic of GWT generator in three posts. This is the first one regarding what is GWT generator. Second one here shows a simple GWT generator example. And a third one here provides simple ways how you can debug your GWT generator.
So what is GWT generator: GWT generators are a way to replace some GWT client codes with some generated code at the compile time (through deferred binding).
Examples of where you might use GWT generators could be:
Follow this post if you are interested in a very simple GWT generator example.
Finally, when I was finished, it was very easy in retrospect. But lack of detailed documentations made the task difficult, or I would rather say elusive. It was so frustrating, that I have decided to write my first ever blog entry :).
I have divided the topic of GWT generator in three posts. This is the first one regarding what is GWT generator. Second one here shows a simple GWT generator example. And a third one here provides simple ways how you can debug your GWT generator.
So what is GWT generator: GWT generators are a way to replace some GWT client codes with some generated code at the compile time (through deferred binding).
Examples of where you might use GWT generators could be:
- Use the full power of Java Runtime Environment, instead of the emulated JRE GWT provides (which is limited in many aspects). This can be useful when your required features are missing in GWT JRE (like File IO).
- Since you have the power of standard JRE, you can use generator as a wrapper towards third party Java library that does not work inside GWT emulated JRE. For example, you can read SVN information of your project, and make a build ID. Or you can use a template engine to emit code from some template.
Follow this post if you are interested in a very simple GWT generator example.
Tuesday, September 6, 2011
Hold till the tree grows
If you do not have a tree to climb, plant a tree. And wait till the tree grows..
Subscribe to:
Posts (Atom)